


The RF220 engines in the EK2100-220 kit are the fundamental connection point between hardware and the Internet of Things. The RF220 is essentially a microcontroller with an embedded RF radio and memory, but the thing that makes it special is the SNAP network operating system.
The SNAP Engines on the SN132 SNAPstick and SN171 protoboard are pre-loaded with the McastCounter.py demo SNAPpy script. This demo script showcases a small portion of the SNAP node’s capabilities and gives you a chance to get familiar with the nodes without installing any software on your PC.
Power up your protoboard by connecting the battery pack (with batteries installed!) to the VBAT IN plug. If all goes well, a LED should start to blink.
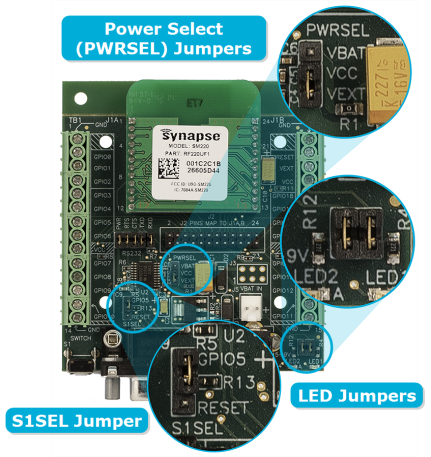
NOTE: If a LED doesn't flash you may not have power. Double-check to see if the "PWRSEL" jumper is set to ""VBAT" (see image in the "WAIT! It didn't work..." section below).
Press the pushbutton on the protoboard.
NOTE: There is a "S1SEL" jumper on each SN171 board that selects between "button is RESET" and "button is GPIO_5". Make sure the jumper is in the position labeled "GPIO5" on the silk-screen, or the demo won't work (see image in the "WAIT! It didn't work..." section below).
Voila! You have interaction! The LED on the SNAPstick will change its pattern (yellow, green, amber) every time the pushbutton is pressed.
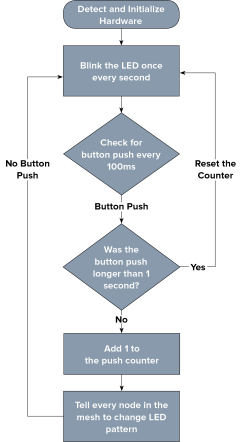 When the RF220 engine is powered, it instructs the node to blink an LED once every second while it waits for a button push within the mesh.
The McastCounter.py script keeps track of a global count. This count is incremented every time a ‘button press’ is registered on any button-equipped module in the mesh and running the McastCounter.py script.
Push the button on the SN171 protoboard. The LEDs on the SN171 protoboard, and the LED on the SN132 SNAPstick, will change pattern with each button press.
Press-and-hold the button and the LED configuration will return to its original state (i.e. the count returns to zero and all the LEDs turn OFF.)
Press the button again and verify that the LED blinks in the same pattern. If you power cycle the SN171 protoboard, you can see that the LED on the SN171 protoboard begins to flash again waiting for you to press the button to change the pattern.
Key Concept
When an RF module gets power, it immediately boots the SNAP OS and executes whatever code is present.
This code, a SNAPpy script written in Python, is the fundamental building block for your IoT solution. A SNAPpy script can be programmed for many tasks. It's not limited to just reading a sensor.
This demonstrates a few key concepts surrounding the SNAP OS:
The counting was accomplished using the multicast capabilities of SNAP. If other modules were added to the network, they too would track the button count and could also participate in the counting.
Key Concept
A point of interaction within a mesh network is called a node.
Key Concept
On power-up, the RF engines automatically network with each other to form a mesh network.
One strength of SNAP is it automatically networks SNAP nodes that are in range. No extra programming or configuration is needed. Just like with the previous example, it works “out of the box.”
Adding a SNAP node to your IoT design opens it to the possibilities of the IoT. SNAP enabled machines can communicate with each other, report what they’re observing, what they’re doing, and give other nodes within the mesh the ability to act and react based on these inputs. In demonstration one, the LED on the SNAPstick changed in response to a button push on the SN171, despite the fact that the SNAPstick didn’t have a button of its own.
This ability to autonomously issue and execute instructions is what makes an IoT solution powerful. Monitoring applications in real time and getting up to the moment reports is great, but it’s even better when the network can react to what is sensed. A leak detection sensor underneath your refrigerator will alert you as soon as it detects a problem, but what if it’s while you’re at work, or on vacation?
A leak detector built on the SNAP platform can issue instructions to any other SNAP enabled device, meaning it can alert you to the presence of water while also shutting off the valve to prevent further damage. This can be especially powerful in situations where time is of the essense, and you don't want to wait while information is transmitted back to a central decision making point.
In this way, a sense and respond network becomes a central nervous system for your connected devices. When any part of the network senses danger, it can respond with a quick reflex action to limit harm.
| Problem | Action | Description | |
|---|---|---|---|
| The LEDs didn’t illuminate | Verify the power related jumpers | Your SN171 Proto Board should have come preconfigured to work with an external DC power supply. Verify that the PWRSEL jumper is in the VEXT position (connecting pins 2-3), and not the VBAT position (connecting pins 1-2.) |
|
| Verify the LED related jumpers | The SN171 Proto Board should come preconfigured to enable its two on-board LEDs. If either of the units is not blinking its LED, it is worth verifying that both LED jumpers are installed. | ||
| The LEDs are lit, but they’re not changing | Make sure the button is enabled | If you are not seeing the LEDs change on the SN171 Proto Board make sure that the button is enabled. The S1SEL jumper located up and to the right of the button should be set to ‘GPIO5’ (connecting pins 1 and 2) and not to ‘RESET’ (pins 2 and 3.) | |
| I can’t stop pushing the buttons and watching the LEDs change | It’s likely that you appreciate awesome technology | This isn’t a bad thing. In fact, you’d fit right in with the crew here at Synapse. Take a look at www.synapse-wireless.com/careers/ and see if we have an opening for your field of expertise. | |